Dice Game with Scratch

Introduction
Coding is one of those essential skills needed by students today. Much like we needed to have typing skills in the past. Coding languages have evolved over the years to provide us with code which resembles English sentences. This makes it much easier for most to learn to code.
In this lesson, we are creating a dice game. The purpose of the game is to teach two concepts. Dice games are considered a form of random number generator. This random number generator is useful when teaching basic concepts in probability. The second concept is of course coding. We will spend the majoring of our time coding.
You will learn how to create this game using Scratch. Scratch is a free online development platform. It uses blocks instead of typed lines of code. Blocks are useful for those new to coding. Code blocks are like a basic sentence. We change parts of the sentence to change the meaning of the sentence. For example, John ran to the store is a sentence. To change its meaning we substitute nouns and verbs. John walks to the market. We can also say Matthew skips and hops to the store.
You will create variables to store values. Variables are like letters in an algebraic equation. Variables are also like the nouns and verbs we change in a sentence.
You will use a random number code block to generate the numbers for our dice game. A Sprite will display our dice images. Sprites are what we call graphics in Scratch. You will learn how to use Sprite costumes to represent each dice image. We will use the random number generated and costumes to display the appropriate dice image.
I created the Sprite and costumes for our program. Use the resources button to download the graphics.
This project is inspired by a coding project taught by the App Brewery. They use this project to teach Swift coding fundamentals. Swift is a language used to develop apps for iOS devices like iPhone, iPad, and Mac.
Scratch accounts
Anyone can use scratch to create products. You don't need an account to create a product. You do need an account to save your product. The requirement for creating an account is that you be thirteen years of age or older.
Most school districts create and manage accounts for students. These accounts are typically through services like Microsoft and Google. Scratch currently supports Google account integration. If your students don’t have Google accounts then you will need to get a teacher account through scratch.
Go to https://scratch.mit.edu/educators and scroll to the bottom of the page. You will find a button to apply for an educator account. The process takes a few minutes. You can create and manage student accounts through this educator account. If you aren’t sure how to do this, please read my issue on
Scratch Coding for Storytelling. It walks you through the process.
Dice Game
Log into Scratch and click the create button.

Title the project Dice Game.

Code is Scratch assigned to Sprites. The Scratch Cat is a Sprite. It is included with every new project. Sprites appear on the stage area to the right of the coding canvas.
We won’t create our dice Sprites yet. Let’s understand the fundamentals of our code first. When coding we want to try out our ideas to see how they work before diving into the full project.
Here are some math concepts. Each Die has six sides. In math, we call each side a Face. A Die has six faces. The corners of the Die are called Vertices. One corner is called a Vertex. The lines that connect the corners are called Edges. A Die is a cube.

How many Edges and Vertices does a Die have? It has 8 vertices and 12 edges.
Each face in our die has dots that represent numeric values. The dots begin with one and go all the way up to six. We need to generate a number from one to six.
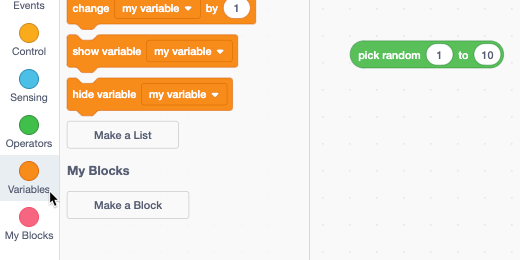
Math code blocks are found in the Operators section. Click on the Operators section and find the code block to pick a random number. This code block is an oval shape. The block has two circles. Each has a number inside. The block as it appears will select a number between one and ten.

Click and drag this code block onto the coding canvas. This code block doesn’t do much on its own. We need to combine it with another code.

We want to display the selected random number. To do this we will create a variable. The variable will hold the selected random number. Select the Variables category.
Click the “Make a variable” button.
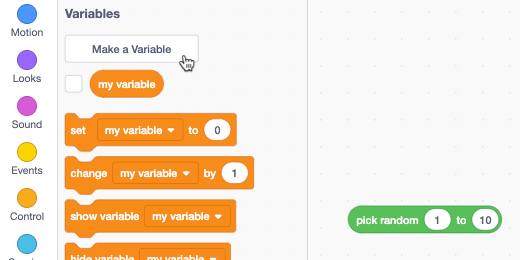
We are prompted to enter a name for the variable. Names for variables should be descriptive. They should describe what the variable will hold.

The name of the variable is “selected random number”. Click the OK button.

The variable is created and selected. The variable is available for us to use with other code blocks in the variable category.

Place the “set ’my variable’ to 0” block on the canvas.
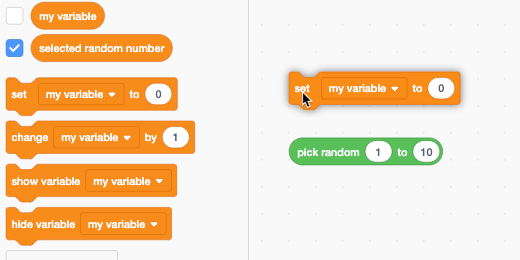
Click the “my variable” selector and choose the variable we created.

The variable is set to receive the number zero. This is the value of the parameter. What we want is the value of the random number to be assigned to the variable.

Drag the “pick random 1 to 10” code block over the parameter for our variable. Notice how the shapes match. The oval for the parameter will highlight when the block is ready to be accepted. Release the block when the parameter highlights.

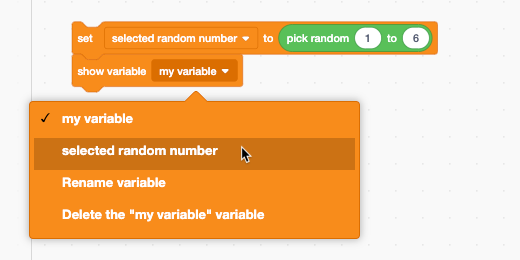
Change the random number picker value from 10 to 6. Our variable will receive one of six random numbers generated by the random number generator. Once the number is generated we need to display the results.

Drag the “show variable” code and attach it to the bottom.

Click the “my variable” sector and choose our variable.
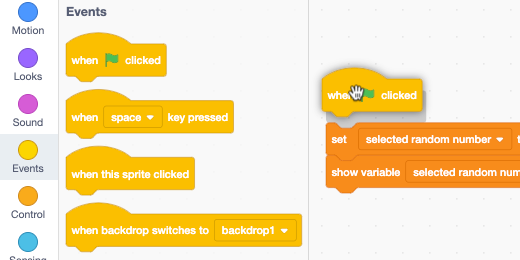
Our basic code is almost ready. We need something to start the program running. We need an event.

Go to the Events category. Drag the “When ‘Flag’ clicked” code onto the canvas and attach it to the top of our first line of code.
Let’s read the code like a sentence. When the flag is clicked, set the variable, selected random number, to a random number. Show me the random number assigned to the variable. Do you see how the code fits into a standard English sentence?
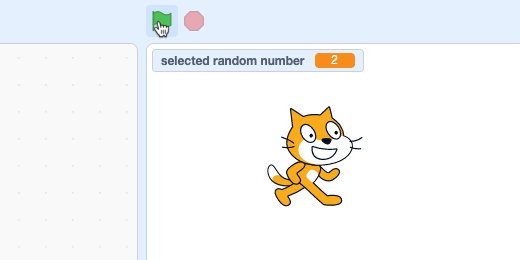
Let’s get the code running. Look at the stage. The stage has the Scratch cat Sprite. There is a block at the top of the stage. This block shows our selected random number. It is placed there when we create a variable. Above the stage is a flag icon. This is the button we press to run the code.

ready to run our code
Click the flag to generate and display a random number between one and six. Click the flag a few more times. A random number will display each time. Sometimes the same number might appear again. This is what happens with random numbers. Random numbers repeat sometimes.
This is the essence of what our program does to generate and display a random number from one to six. The next step is to use the same code to display the face of a die. At this point, we need to create a sprite of our own. Make sure you have downloaded the image file from the link. Here is the link again. Make sure to decompress the zip file.
Creating a sprite
Move your mouse over the add sprite icon. A list of icons will open. Select the option to “Upload Sprite”.
There are six images in the Dice image folder. Select the image that represents the number one. Click the Open button.

A sprite is created with the image and selected.
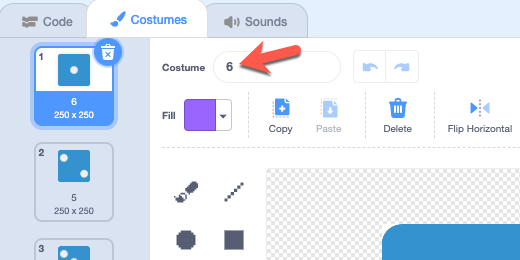
Go over to where the code blocks are located and click the Costumes tab.

Our sprite has one costume.
Click the add costume button and select the option to upload a costume.
Go to the dice image folder and select the remaining images.
The images are added to our sprite as costumes. We need to arrange them so they are in order from one to six.
Click and drag the images to place them in order.
The costume name and image don’t match. We need to change the name of each costume. We plan to use a pair of dice. To that end, we need to name each costume with a name that describes the costume. Click on the first costume and erase the number that represents the costume name.
Name the first face “die1costume1”. Name the next costume “die1costume2”. Name the next costume “die1costume3”. Repeat the process for the rest of the sprite costumes.
Return to the Code section.

Click once on the sprite we created to place it on the stage. We have two sprites on the stage. We don’t need the cat any more.

Click on the Scratch sprite. Click the trash can icon to remove this sprite.
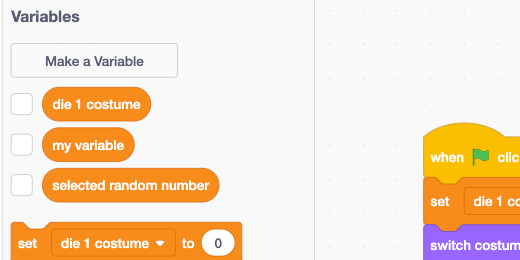
Go to the variables section and create a variable. Call the variable “die 1 costume”.

When we deleted the Scratch sprite we also deleted the code that was attached to the sprite. That’s okay because we know what to do now. Place the set code onto the canvas. Make sure that the “die 1 costume” is selected for the variable.
Each costume has a near-identical name. The only difference is the number for the costume. We will use this number to select the costume to display. The number will come from our random number generator. We are going to join the name of the die costume with the number generated. There is a block in the Operators section that helps us do this.
Find the join code and place it in the parameter field.

Replace the word apple with “die1costume”. Don’t include a number for the costume. This number will come from the number generator.

Place the random number generator code onto the parameter that currently has the word banana in it. Change the value from 10 to 6.

Go to the Looks section. Find the “switch costume to” code.

Attach the code to the bottom of our current code.

Go to the variables section and get the “die 1 costume” variable.

Place the variable onto the existing switch costume parameter. This replaces the variable with our own.

Go to the Events section and place the “when flag clicked” event at the beginning of the code.

Click the flag button to change the die face on the stage. Look at the die 1 costume information block. The costume number matches the face of the die shown on the stage. We don’t need these information blocks on the stage. Go to the variables section to hide them.

Remove the checkmark next to each variable.
We have one die in place. Our next task is to repeat this process with another die. The first thing we need to do is rename the sprite. Click on the sprite and change the name in the name field. Name the die “Die1”.
We are going to duplicate this sprite to save us some time. Right-click on the sprite and select duplicate.
The sprite is duplicated and named Die2 for us. This is convenient.
Make sure the new sprite is selected and click the Costumes tab. We are going to change the names of each costume. Changing the names will allow us to display the face of each separately. We only need to change the number for the die. Change the name of “die1costume1” to “die2costume1”. Change the name of the second costume to “die2costume2”. Repeat this process for the other costume names.
Click the Code tab to return to the code libraries. Go to the variables section. Create a new variable. Title the variable "die 2 costume".
We need to set the die 2 costume with a code block. Place the set die 1 costume code below the last code on our canvas. My code block reads die 1 costume. Your parameter might read something else. Click the variable selector and select "die 2 costume".

Go to the operator section. Get the join code and insert it into the parameter for the set code.

Type “die2costume” in the first join parameter.

Place the random number generator in the second join parameter. Change the number from 10 to 6.

Go to the looks section. Place the “switch costume to…” code below the last code block.
Go to the variables section and place the die 2 costume variable in the costume selector.

Our program is done. Click the flag to see the dice change face values. The die is very large. We will fix this in a moment. We need to fix some redundancy in our code first. The code we just finished is attached to the Die2 sprite. Click the Die1 sprite. The code attached to this sprite is the first part of the code that relates to this sprite. Click back onto the Die2 sprite.
We should remove redundant code whenever possible. We don’t need to repeat the code for die1 in die2. Click and drag away the last two code blocks. Leave them on the canvas.
Detach the two code blocks below the event code. Drag them over to the code library panel and release. This will remove them from the coding canvas.
Attach the remaining code on the canvas to the event.
Rearrange the dice
Go to the sprite section and click on the Die1 sprite. The sprite size is set to 100 percent of the image size. Change the size to 75 percent.
The sprite will resize on the stage. Click on the Die2 sprite. Change it to 75 percent.
Click and drag the die sprites on the stage to place them side by side.
Press the event flag a few times to see the faces on the dice change.
The names we used, “die 1 costume” and “die 2 costume” were created to understand what would be going on in our code. In terms of using this for math instruction, it would be better to use “die 1 face” and die 2 face”.
To to the variables section. Right-click on the “die 1 costume” variable. Select “Rename variable”.

Rename the die to “die 1 face” and click the OK button. Repeat the process with the other variable.

That brings us to the conclusion of this project. In part two of this project, I will show you how to create the dice images. The finished project is available below.