Dice App Graphics
Introduction
In last week’s lesson, Creating a Dice Game with Scratch, we created a dice app in Scratch. In that lesson, I provided the dice images for the app. I thought it would be a good idea to show you how I created those images. I am using a free online illustration app. The app is available at https://vectr.com.
The app doesn’t require an account to use. This is good news if your students don’t have Google accounts or are below the age of thirteen. If students do have a Google account then I encourage them to use it. Creating an account allows us to save our project online. Go over to https://vectr.com/login and create your free account. Click the Sign-up button to create an account with one of these services. You can use a different email if you don’t have Facebook, Twitter, or Google.
Dice project Graphics
We need a file to create and store our project. Click the Create File button.

A drawing canvas is opened for our project. There are several tools available to make our project. We will explore some of them while creating the project. Go over to the right side of the canvas. There are five icons. The first three are grouped. Click the center button on the three that are grouped.

The box below the button is where we provide a name for the project. Change the current name of untitled to “Dice Face Images”.

A button appears once we provide a name. Click the button to save the project with the new file name. Leave the other options alone. Make sure the measurement is set to Pixels.

Click on the first button on the left. This opens snapping and grid options.

Select the grid option.

A grid appears on the canvas. This gird will help us in the design of our project.

There is a Shape bar on the left side of the canvas. Look for the ellipse shape. Click the shape to select it. We are beginning the design with the dice circles.

Click and drag a circle shape on the canvas. You will notice that the shape is either a circle or an ellipse. It all depends on how you are dragging the arrow as you draw it out. There is a trick to keep the shape in the form of a circle. Press and hold the shift key with our other hand while dragging the circle.

Your circle should look something like this. Don’t worry if it doesn’t match exactly. We will take care of this later. It’s also okay if the shape isn’t an exact circle. We will take care of this too. The color of your shape is different each time. Don’t worry about the color for now.
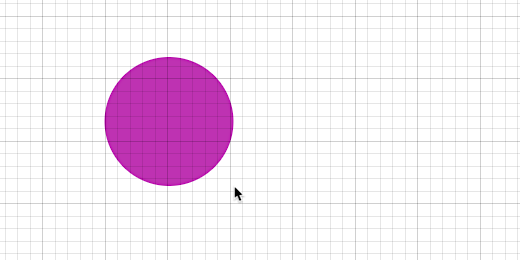
Release the shape. Make sure it is still selected.

There is a properties box on the lower right side of the canvas. The box contains information about the width and height of the shape. The width and height of my shape are close but not exact.

There is an icon between the width and height measurements. It looks like a chain link. The measurements are linked to each other. Click the icon to break the link.

The link icon will disappear. Change the size for the width and height. Change each measurement to 100px.
The image on our canvas is now a nice circle.

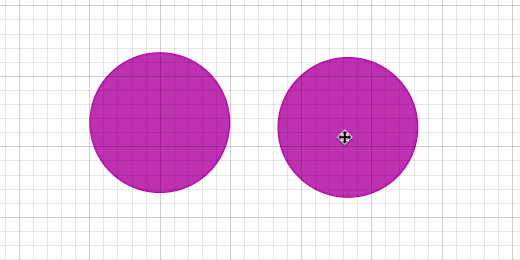
We need more circles for our dice faces. We will make a copy of this shape. Right-click on the shape. Select the duplicate option.

A duplicate appears and overlaps our original shape. Click and drag the shape to one side of the original.

Lines appear around the shape as we move it on the canvas. These are guides. They help us align the object on the canvas. Move the circle so it is parallel to the other.
We want to use the guides to make sure the shapes are parallel to each other. Click and drag the original shape until you see guides appear all around the shape. These guides are aligned with the major grid lines. Major grid lines are darker. Minor gridlines are between major grid lines. Release the shape.

Move the other shape. Use the guides to place the shape within the major grid lines. Make sure the shapes are parallel.

We want to space the shapes so they are even across the dice face. Drag the second shape so that the guides fall on major gridlines. Space them so there is one major square between them.

Right-click and duplicate the second circle.

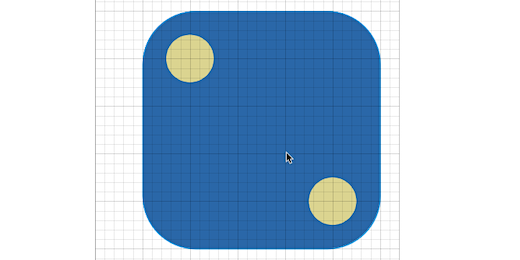
Place the third circle in line with the other two. Space it so there is a major square space between them. These three circles will create the dice face that represents the number six.

Duplicate each circle and place it below each of the three circles. Leave one major square between them. Use the guides to help align the shapes.

Each set of circles represents the numbers on the dice faces. We need a shape to represent the dice itself. Go to the shape bar and select the rounded rectangle shape.

Draw a small rectangle shape above the left circle. Before drawing the full shape we need to know what size to make the shape.

To figure this out we need to look at the size of the circle shapes. Each circle shape is 100 pixels in diameter. There are three circles across so we have 300 pixels in circles. There is a space between each circle. This space is one major square.
Look closer at the circle. The diameter takes up two of these squares. If two squares are 100 pixels then each square is 50 pixels. There are two spaces between each circle. This adds another 100 pixels. We are now up to 400 pixels. We will begin with this value.
Make sure the rounded rectangle is still selected. Go to the properties box. Make sure the link icon is not showing. Change the width to 400px. Leave the height alone for now.

Click and drag the rounded rectangle shape so it is above the circles and centered. Use the guides to help you align the shape. The shape matches the circles from left to right.
This doesn’t leave any space to the left or right. A dice has space on either side of the dots. We need to add some space. We will add 50 pixels on either side. This the spacing consistent.

Go to the property box and change the width of the rounded rectangle to 500px.
Return to the shape on the canvas and move it so the center matches the center of the circles.

Return to the properties for the rectangle. Change the height to 500px.
The rounded rectangle is done but it covers the circles.

Each shape is placed on a layer. Each layer is like a piece of transparent paper. The layers are listed in the layers panel on the left. The rounded rectangle is at the topmost layer. The rectangle layer needs to be placed below the ellipse layers.

Click and drag the layer below the last ellipse layer. A purple line shows where the layer will be placed.

All the circles are visible. We need to space the bottom three circles. We want them closer to the bottom of the rounded rectangle.

Click and drag one of the circles. Place it so the spacing from the edge matches the circles on top. The circle needs to be 50px from the bottom edge. Use the guides to align it with the circle above.

Repeat the process with the other circles.

Colors
Let’s change the colors of our dice face. Click on the rectangle shape. Every shape has a background and border color. The background color for my shape is light blue. Click the color to open the color picker.

Move the color slider on the right to one of your favorite colors. The gradient on the left is used to select the shade for the color. For example, move the slider toward blue. The shape background color changes to match.

Move the dot in the gradient to make the color darker or lighter. Move the slider and the dot to find a color you like for the dice background.

Change the color of the circles using the same method. Click on a circle and choose a contrasting color. For example, if you chose a dark color for the dice background you should choose a light color for the dice circles. I chose a light yellow for my circle.
We need to use this color for the other circles. The color picker keeps track of the colors we use. The colors are represented by a code. The code is shown in the box below the color selector. The color code begins with the “#” symbol.

Click on another circle. We want the circle to be filled with the same color. Click the background color button. Click the eyedropper tool next to the color code box.
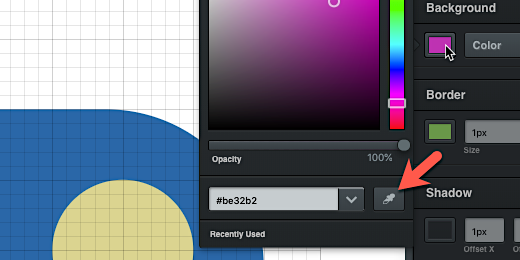
The arrow for the mouse is replaced with a color picker. Move the color picker over the color of the previous circle. Click to select the color.

The color of the circle changes to the color you selected. Repeat the process with the remaining circles. Remember to select the circle that needs a color first. Choose the color you want with the color picker.

You are finished with the first face of our dice image set. The creation of the rest of the images is much easier.

Adding pages
Each image is constructed from shape layers. The image layers are part of a page. Our first dice image is on one page. Click pages to switch to the pages section.

We are going to use our first image as the basis for the remaining images. This will save time. Click the duplicate icon. The icon is below the image page preview.

The page is duplicated and selected for us. A light border appears around selected pages.

Go tot he image for this page and click the top center circle. Press the delete key on your keyboard to remove the circle from the image. You can also right-click the shape and select delete.

Select the center circle on the bottom and drag it up toward the center.

Use the guides to help you align the circle.

We have our face for the number five dice face.

Click the duplicate button for the second page.

Click the center circle and press the delete key on your keyboard. We now have the dice face for the number four. Duplicate this page.

Delete one of the corner circles. Move the other circle to the center of the shape. We now have the face for the number three. Duplicate the page.

Remove the center circle. Duplicate the page.
Remove one of the corner circles. Move the remaining circle to the center.

Downloading the images
We are done with all the dice face images. The next step is to download the images. The images will be uploaded to your own Scratch Dice App. We need to download each image separately. The last image is currently selected. This image represents the number one.
Return to the panel on the right side of the canvas. Click the export button.

The image appears in a preview area. The grid background has disappeared. The grid is not saved as part of the image.

The preview configuration panel has several options. We are exporting the selected page. The image is set to be exported using the SVG, Scalable Vector Graphic format. The size of the shape is 640 by 640 pixels. There is a link to this image by we won’t be using that here. There is a download and print button.

The image is set to be exported as an SVG. This is a very good format to use. This format is hard for other programs to use. I like to change the format to one that is more universal. Click the image format selector and choose PNG, Portable Network Graphics. This format is popular when we want to include transparent areas in our image. In this case, the transparent area would be the background.

Just so we can see the difference. Click the image format selector again and choose jpg, Joint Photographic Experts Group. This format does not support transparency. This is why we see the white canvas area around the image. Return to the PNG format.

Click the download button. The image is downloaded immediately. Click the “X” button to close the export options.

Click the page above the image we just exported. Repeat the process to export this image. Make sure the image format is set to PNG and click the download button. Repeat the process for the rest of the pages and images. Each image file is named Dice Face Image followed by a number. Except for the first image. You can rename the images or upload them to your Scratch project with this name. I recommend renaming the images.